White Chicken Chili Recipe: Creamy, Hearty, and Packed With Bold Flavor
Introduction
When most people picture a bowl of chili, they imagine something dark, red, and deeply smoky — a dish built on tomatoes, kidney beans, and bold chili powder that has been simmering for hours on the back of the stove. White chicken chili challenges that image entirely and replaces it with something equally bold, equally satisfying, and arguably even more addictive. It is creamy where traditional chili is thick, mild where red chili is sharp, and built around chicken rather than beef — yet it carries every bit of the same comforting, warming energy that makes chili one of the most beloved cold-weather dishes in existence.
The foundation of white chicken chili is a combination of ingredients that each bring something essential to the finished bowl. White beans provide the starchy body and mild, earthy flavor that anchors the dish. Green chiles contribute a gentle, smoky heat that builds gradually rather than overwhelming the palate immediately. Cumin and oregano layer in warmth and herbaceous depth. And the addition of cream cheese near the end of cooking is what transforms the broth from a simple seasoned liquid into something genuinely luxurious — thick, velvety, and rich in a way that makes every spoonful feel deeply satisfying.
This recipe is designed for real weeknight cooking. It does not demand hours of simmering or a long list of obscure ingredients. Everything comes together in a single pot in under an hour, and the result is a dish substantial enough to feed a hungry family, impressive enough to serve to guests, and versatile enough to be customized in a dozen different directions depending on your mood and what you have on hand.
Prep Time, Cook Time & Calories at a Glance
| Detail | Information |
|---|---|
| Prep Time | 15 minutes |
| Cook Time | 40 minutes |
| Total Time | 55 minutes |
| Servings | 6 |
| Calories per Serving | 360–410 kcal |
| Protein per Serving | 32–36g |
| Carbohydrates | 28–32g |
| Fat | 14–18g |
| Sodium | 720–860mg |
Calorie estimates vary based on the fat content of the cream cheese used, specific broth brand, and toppings added at serving.
Ingredients
For the Chili Base:
- 700g (1.5 pounds) boneless skinless chicken breasts or thighs
- 2 tablespoons olive oil
- 1 medium yellow onion, finely diced
- 4 cloves garlic, minced
- 2 cans (400g each) white cannellini beans or Great Northern beans, drained and rinsed
- 2 cans (115g each) diced mild green chiles
- 4 cups low-sodium chicken broth
- 1 cup frozen or fresh corn kernels
For the Seasoning:
- 2 teaspoons ground cumin
- 1 teaspoon chili powder
- 1 teaspoon dried oregano
- ½ teaspoon smoked paprika
- ½ teaspoon garlic powder
- ½ teaspoon onion powder
- ½ teaspoon salt
- ¼ teaspoon cayenne pepper (adjust to heat preference)
- ¼ teaspoon freshly cracked black pepper
For the Creamy Finish:
- 115g (4 oz) full-fat cream cheese, softened and cubed
- ½ cup sour cream
- ½ cup heavy cream or whole milk
- 1 tablespoon fresh lime juice
For Toppings (Optional but Recommended):
- Shredded Monterey Jack or pepper jack cheese
- Fresh cilantro, roughly chopped
- Sliced jalapeño
- Diced avocado or guacamole
- Sour cream
- Crushed tortilla chips
- Lime wedges
Step-by-Step Instructions
Step 1 — Sauté the Aromatics Heat the olive oil in a large heavy-bottomed pot or Dutch oven over medium heat until shimmering. Add the finely diced onion and cook for five to six minutes, stirring occasionally, until it becomes completely soft, translucent, and beginning to turn lightly golden at the edges. Add the minced garlic and cook for one additional minute, stirring constantly to prevent it from burning. The kitchen should smell deeply fragrant and inviting at this point, which signals that the aromatic foundation of the chili is properly developed and ready to build upon.
Step 2 — Toast the Spices Add the ground cumin, chili powder, dried oregano, smoked paprika, garlic powder, onion powder, cayenne pepper, salt, and black pepper directly to the softened onion and garlic in the pot. Stir the spices continuously for one full minute, allowing them to toast gently in the residual oil. This brief toasting step activates the fat-soluble flavor compounds within the spices and deepens their overall character significantly — the cumin becomes nuttier, the chili powder more complex, and the oregano more aromatic. Do not skip this step as it makes a meaningful difference in the depth of the finished chili.
Step 3 — Add the Chicken and Broth Place the whole chicken breasts or thighs directly into the pot without cutting them first. Pour the chicken broth over the top, add the diced green chiles with their liquid, and stir everything together to combine. Increase the heat to medium-high and bring the mixture to a gentle boil. Once boiling, reduce the heat to medium-low, cover the pot with a lid, and allow the chicken to poach gently in the seasoned broth for twenty to twenty-five minutes until it is completely cooked through and tender enough to shred easily with two forks.
Step 4 — Shred the Chicken Using tongs or a slotted spoon, carefully remove the cooked chicken from the pot and transfer it to a cutting board. Using two forks, shred the chicken into generous, irregular pieces — not too fine and not too chunky. The irregular shredding creates varying textures throughout the chili, with some pieces absorbing more broth and flavor than others, which makes each spoonful more interesting and satisfying. Return all of the shredded chicken and any accumulated juices from the cutting board back into the pot.
Step 5 — Add the Beans and Corn Add the drained and rinsed white beans and the corn kernels to the pot and stir to distribute them evenly throughout the chili. For a thicker, creamier consistency — which most people strongly prefer — use the back of a large spoon or a potato masher to roughly mash approximately one quarter to one third of the beans directly in the pot before stirring. This releases their starchy interior into the broth and naturally thickens the chili without requiring any additional flour, cornstarch, or other thickening agents. Allow everything to simmer together uncovered for five minutes.
Step 6 — Add the Creamy Elements Reduce the heat to low. Add the softened cream cheese cubes to the pot and stir continuously until they melt completely into the broth with no visible lumps remaining — this takes approximately two to three minutes of steady stirring. Pour in the heavy cream or whole milk and the sour cream, stirring gently to incorporate both. Add the fresh lime juice and stir once more. Allow the chili to simmer on low heat for five additional minutes, stirring occasionally, until the broth has thickened into a smooth, velvety, deeply creamy consistency. Taste and adjust seasoning with additional salt, lime juice, or cayenne as needed.
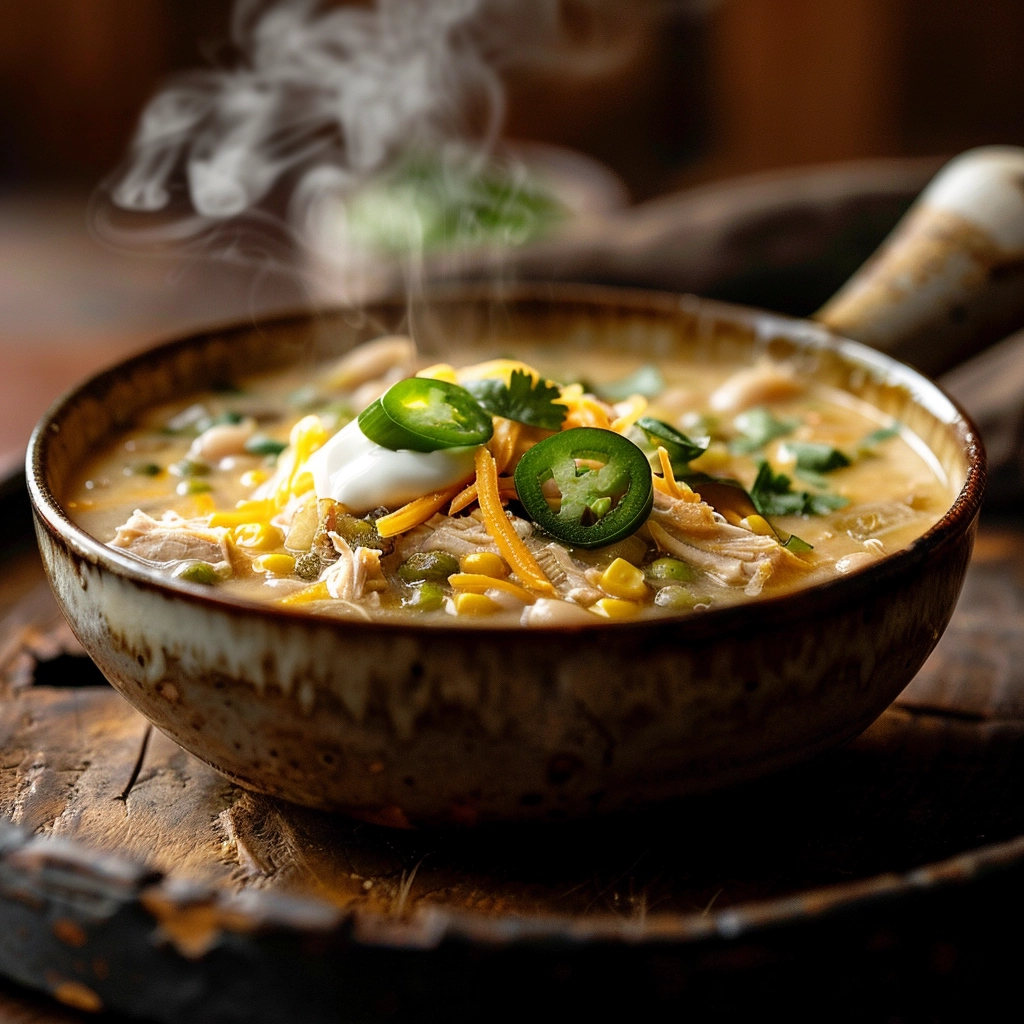
Step 7 — Serve with Toppings Ladle the finished white chicken chili into deep bowls and encourage everyone to customize their own toppings generously. Shredded Monterey Jack cheese melts beautifully into the hot chili, fresh cilantro adds brightness, sliced jalapeño contributes fresh heat, diced avocado provides cool creaminess, and crushed tortilla chips deliver a satisfying crunch that contrasts wonderfully with the velvety texture of the chili beneath. Serve with lime wedges on the side for an extra squeeze of acidity that brightens the entire bowl.
Serving Suggestions
With Warm Cornbread: Cornbread and chili is one of the most classic and deeply satisfying food pairings in American cooking. The slightly sweet, crumbly texture of a warm square of cornbread against the creamy, savory chili is a combination that needs no improvement or justification. Serve the cornbread directly in the bowl alongside the chili or on the side for dipping and soaking up the rich broth.
Over Steamed Rice: Ladling white chicken chili over a bowl of plain steamed white or brown rice transforms it into an even more substantial and filling meal. The rice absorbs the creamy broth beautifully and stretches the recipe further, making it an excellent option when feeding a larger group than the original recipe serves.
With Tortilla Chips: Set out a generous basket of thick tortilla chips alongside the chili for scooping rather than using a spoon. This transforms the meal into something more casual and snackable — perfect for game day gatherings, casual weeknight dinners, or any occasion where you want the meal to feel relaxed and fun rather than formal.
For Game Day or Gatherings: Keep the chili warm in a slow cooker set to the low or warm setting and set up a toppings bar beside it with all the garnishes arranged in small bowls. Allow guests to serve themselves and build their own bowls exactly as they prefer. This self-serve format works beautifully for groups and takes all the serving pressure off the host entirely.
Creative Variations
Slow Cooker Version: Add the sautéed aromatics, toasted spices, raw chicken, broth, green chiles, beans, and corn to a slow cooker. Cook on low for six to seven hours or on high for three to four hours. Shred the chicken directly in the slow cooker using two forks, then stir in the cream cheese, sour cream, heavy cream, and lime juice. Replace the lid and cook on high for an additional fifteen minutes until the creamy elements are fully incorporated and smooth.
Extra Spicy Version: Double the cayenne pepper, add one finely diced fresh jalapeño to the aromatics at the beginning, use hot diced green chiles instead of mild, and swap the Monterey Jack topping for pepper jack cheese. This version delivers a genuine, building heat that spice lovers will appreciate without crossing into uncomfortable territory.
Roasted Poblano Variation: Replace the canned green chiles with two fresh poblano peppers that have been roasted directly over a gas flame or under the broiler until charred, then peeled, seeded, and diced. Roasted poblanos bring a smoky, slightly fruity depth to the chili that canned chiles simply cannot replicate and elevates the finished dish considerably.
Lighter Version: Replace the cream cheese with a block of softened light cream cheese, substitute the heavy cream with whole milk or evaporated skim milk, and use Greek yogurt in place of sour cream. The chili remains creamy and satisfying while carrying significantly fewer calories per serving — a meaningful adjustment for those monitoring their intake without wanting to sacrifice the dish’s core character.
Storage Instructions
Allow the chili to cool completely before transferring to airtight containers. Store in the refrigerator for up to four days. The flavor deepens noticeably overnight as all the spices and creamy elements continue to meld together, making leftovers genuinely exceptional. Reheat gently on the stovetop over medium-low heat, stirring frequently, and add a small splash of chicken broth if the chili has thickened too much during storage. This chili freezes well for up to three months — freeze in individual portions for convenient single-serving meals. Thaw overnight in the refrigerator before reheating. Note that the creamy texture may separate slightly after freezing but returns to its smooth consistency with gentle stirring over low heat.
Notes
- Soften the cream cheese before adding: Cold cream cheese straight from the refrigerator does not melt smoothly into hot liquid — it tends to leave small lumps that are difficult to dissolve fully even with vigorous stirring. Allow the cream cheese to sit at room temperature for at least thirty minutes before adding it to the chili, or cut it into very small cubes and microwave it for fifteen seconds to soften it slightly before stirring it into the pot.
- Mash some of the beans for natural thickness: The single most effective way to achieve the thick, stew-like consistency that makes white chicken chili so satisfying is to mash a portion of the white beans directly in the pot rather than adding any flour or cornstarch. This technique releases natural starch into the broth and thickens it organically without altering the flavor or introducing any unwanted floury texture to the finished dish.
- Use chicken thighs for maximum flavor: While chicken breasts work perfectly well and produce a leaner result, boneless skinless chicken thighs deliver noticeably more flavor and remain juicier after poaching due to their higher fat content. If richness and depth of flavor are your priorities over calorie count, reach for thighs without hesitation — they make a meaningfully better bowl of chili in terms of both taste and texture.
Frequently Asked Questions (FAQs)
Q1. Can I use rotisserie chicken instead of cooking raw chicken in the pot?
Yes, and it is one of the most convenient shortcuts this recipe accommodates without any meaningful sacrifice in quality. Simply skip the poaching step entirely, shred the rotisserie chicken by hand, and add it to the pot after the beans and corn have been incorporated and warmed through. Using pre-cooked rotisserie chicken reduces the total cooking time by nearly half and produces a result that is virtually indistinguishable from the version made with freshly poached chicken.
Q2. My chili turned out too thin. How do I thicken it?
Several reliable methods work well here. The first and most seamless approach is to mash more of the white beans directly in the pot — the more beans you mash, the thicker the broth becomes. Alternatively, mix one tablespoon of cornstarch with two tablespoons of cold water until smooth and stir this slurry into the simmering chili, allowing it to cook for two to three minutes until the desired thickness is reached. A third option is simply to simmer the chili uncovered for an additional ten to fifteen minutes, which allows excess liquid to evaporate and the broth to concentrate and reduce naturally.
Q3. Can I make white chicken chili dairy-free?
Yes, with a few straightforward substitutions. Replace the cream cheese with a dairy-free cream cheese alternative made from cashew or almond base. Substitute the heavy cream with full-fat canned coconut milk, which provides a comparable richness and creaminess without any dairy. Use a dairy-free sour cream alternative or simply omit it and compensate with an extra squeeze of lime juice for brightness. The finished chili will have a very slight coconut undertone from the coconut milk but remains deeply flavorful and satisfying throughout.
Q4. How spicy is this chili and how do I adjust the heat level?
As written, this recipe produces a mildly spicy chili with gentle, building warmth that most people including those with moderate heat tolerance find very comfortable. To reduce the heat further, omit the cayenne pepper entirely and choose the mildest available brand of canned green chiles. To increase the heat significantly, double the cayenne, add fresh diced jalapeño or serrano pepper to the aromatics at the beginning, and use hot green chiles instead of mild. The spice level of this recipe is genuinely easy to dial up or down without affecting any other aspect of the finished dish.
Conclusion
White chicken chili is the kind of deeply satisfying, endlessly adaptable one-pot meal that belongs in every home cook’s permanent repertoire — delivering the warmth, richness, and bold comforting flavor of classic chili through a creamy, lighter-colored bowl that feels both familiar and excitingly fresh, and proving with every single spoonful that the best weeknight cooking does not have to be complicated to be truly extraordinary.


