KFC Fried Chicken Recipe: Crispy, Juicy, and Packed With Secret Flavor
Introduction
There are very few foods on earth that have achieved the kind of global, cross-cultural recognition that KFC fried chicken commands. From its origins in a small roadside restaurant in Corbin, Kentucky, where Harland Sanders first began perfecting his pressure-fried chicken recipe in the 1930s, to its current status as one of the most recognized fast food brands across more than one hundred and forty countries, the appeal of this particular fried chicken has never waned, never gone out of fashion, and never stopped inspiring home cooks to try to recreate its magic in their own kitchens.
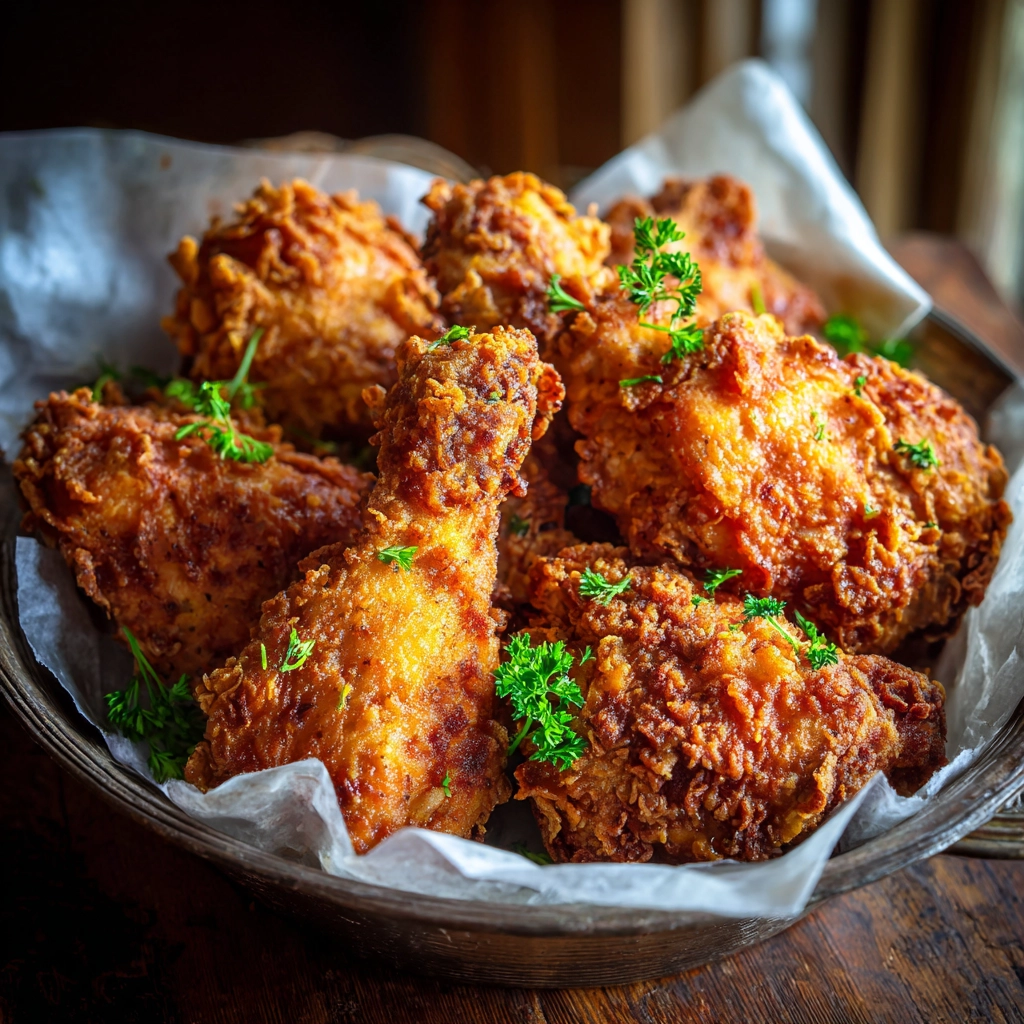
What makes KFC fried chicken so immediately and universally compelling is a combination of factors that work together seamlessly. The crust is thick, craggy, and shatteringly crisp with a deep golden color that signals proper frying temperature and technique. The seasoning is bold and layered with a complexity that keeps the flavor interesting from the first bite to the last. And beneath all of that crust, the chicken itself is tender, juicy, and cooked through in a way that cheaper, faster fried chicken simply never manages to achieve. Every element serves a purpose, and every element is executed with precision in the original — and in this recipe.
The so-called secret behind KFC’s flavor has been the subject of endless speculation, reverse-engineering attempts, and heated debate among food enthusiasts for decades. While the exact proprietary blend remains officially undisclosed, food scientists and culinary researchers have narrowed the essential components down to a blend of eleven herbs and spices — a number Colonel Sanders himself confirmed in interviews throughout his lifetime. This recipe works from that foundation, building a spice blend that captures the warmth, depth, and unmistakable character of the original with ingredients every well-stocked kitchen already has on hand.
Prep Time, Cook Time & Calories at a Glance
| Detail | Information |
|---|---|
| Prep Time | 20 minutes |
| Marinating Time | 4 hours minimum (overnight preferred) |
| Cook Time | 28–32 minutes |
| Total Time | 50 minutes active (plus marinating) |
| Servings | 4 to 6 |
| Calories per Serving | 420–480 kcal |
| Protein per Serving | 34–38g |
| Carbohydrates | 22–26g |
| Fat | 22–28g |
| Sodium | 780–920mg |
Ingredients
For the Buttermilk Marinade:
- 1 whole chicken, cut into 8 pieces (or 1.2kg / 2.6 pounds bone-in skin-on chicken pieces)
- 2 cups full-fat buttermilk
- 1 tablespoon hot sauce (Louisiana-style preferred)
- 1 teaspoon salt
- 1 teaspoon garlic powder
- 1 teaspoon onion powder
- 1 teaspoon smoked paprika
For the Eleven-Spice Coating:
- 2 cups all-purpose flour
- ⅓ cup cornstarch (the secret to extra crispiness)
- 2 teaspoons salt
- 1½ teaspoons smoked paprika
- 1½ teaspoons garlic powder
- 1½ teaspoons onion powder
- 1 teaspoon dried thyme
- 1 teaspoon dried basil
- 1 teaspoon dried oregano
- 1 teaspoon celery salt
- 1 teaspoon white pepper
- ½ teaspoon freshly cracked black pepper
- ½ teaspoon ground mustard powder
- ½ teaspoon ground ginger
- ½ teaspoon cayenne pepper
For Frying:
- Enough vegetable oil, canola oil, or peanut oil to fill your pot or deep skillet to a depth of at least 3 inches
- Cooking thermometer (essential for accurate oil temperature)
Step-by-Step Instructions
Step 1 — Break Down and Prepare the Chicken If starting with a whole chicken, break it down into eight pieces — two drumsticks, two thighs, two wings, and two breast pieces halved crosswise to ensure even cooking. Pat every piece completely dry with paper towels. Drying the surface of the chicken is a critical preliminary step — excess moisture on the skin creates steam during frying, which prevents the crust from achieving the deep, shattering crispness that defines great fried chicken. Use a sharp knife to score two or three shallow cuts through the skin and into the flesh of the larger pieces like the breasts and thighs — this allows the marinade to penetrate more deeply and ensures the coating adheres more completely during the dredging process.
Step 2 — Marinate the Chicken Overnight In a large bowl, whisk together the buttermilk, hot sauce, salt, garlic powder, onion powder, and smoked paprika until completely combined. Submerge all of the chicken pieces in the marinade, pressing them down to ensure complete coverage. Cover the bowl tightly with plastic wrap and refrigerate for a minimum of four hours, though overnight marinating — eight to twelve hours — produces a meaningfully superior result. The lactic acid in the buttermilk works slowly and gently to break down the protein structure of the chicken, tenderizing the meat without making it mushy, while the seasoning penetrates deeply into every layer. This is the foundational step that separates genuinely great fried chicken from merely good fried chicken, and it should not be rushed or skipped under any circumstances.
Step 3 — Mix the Eleven-Spice Coating In a large, wide bowl or shallow baking dish, combine the all-purpose flour, cornstarch, salt, smoked paprika, garlic powder, onion powder, dried thyme, dried basil, dried oregano, celery salt, white pepper, black pepper, ground mustard powder, ground ginger, and cayenne pepper. Whisk the dry ingredients together thoroughly until the spices are completely and evenly distributed throughout the flour — no streaks of individual spices should be visible. The cornstarch mixed into the flour is not a minor detail — it is a deliberate technique that creates a coating that fries up significantly crispier and more shattering than flour alone would produce, because cornstarch inhibits gluten formation and produces a more delicate, crackling crust.
Step 4 — Double Dredge the Chicken Remove the chicken pieces from the buttermilk marinade one at a time, allowing the excess marinade to drip off for a few seconds without shaking aggressively — you want a light, even coating of buttermilk remaining on the surface of each piece to help the flour adhere. Place the piece in the spice coating mixture and press firmly on all sides, working the flour into every crevice, skin fold, and scored area. Shake off any truly loose excess, then dip the piece back into the buttermilk marinade briefly and return it to the flour for a second coating. This double-dredging technique creates the thick, layered, craggy crust that is the visual and textural signature of great KFC-style fried chicken. Place each double-dredged piece on a wire rack set over a baking sheet and allow all the coated pieces to rest for fifteen minutes before frying — this resting period allows the coating to hydrate slightly and adhere more firmly to the chicken, dramatically reducing the risk of the crust separating from the meat during frying.
Step 5 — Heat the Oil to the Correct Temperature Pour enough oil into a large, heavy-bottomed pot, Dutch oven, or deep cast-iron skillet to reach a depth of at least three inches. Heat the oil over medium-high heat, monitoring the temperature carefully with a cooking thermometer. The target temperature for frying this chicken is 175°C (350°F). This specific temperature is not arbitrary — oil that is too cool produces greasy, soggy chicken because the coating absorbs oil before it has time to set into a crust. Oil that is too hot produces a crust that browns and darkens before the interior of the chicken has time to cook through fully. At 175°C, the coating sets and crisps immediately on contact while the chicken cooks through evenly and gently without drying out.
Step 6 — Fry the Chicken in Batches Working in batches of no more than three or four pieces at a time to avoid crowding the pot and dropping the oil temperature, carefully lower the coated chicken pieces into the hot oil using long tongs. Never drop chicken into hot oil — lower it away from yourself slowly and deliberately to prevent dangerous oil splatter. Fry the chicken pieces according to their size and density — wings for ten to twelve minutes, drumsticks and thighs for fourteen to sixteen minutes, and breast pieces for sixteen to eighteen minutes — turning each piece once halfway through its frying time to ensure even browning on all sides. The chicken is fully cooked when the internal temperature at the thickest part of each piece reads 74°C (165°F) on an instant-read thermometer and the crust is a deep, uniform golden brown across every surface.
Step 7 — Drain and Rest Before Serving Using tongs, transfer the fried chicken pieces from the oil directly to a clean wire rack set over a fresh baking sheet — never to paper towels, which trap steam underneath the crust and cause it to soften within minutes. The wire rack allows hot air to circulate completely around each piece, keeping the bottom of the crust just as crisp as the top while the chicken rests. Allow the chicken to rest for five minutes before serving — this brief rest allows the internal juices to settle and the crust to reach its absolute maximum crispness as the residual steam dissipates.
Serving Suggestions
With Classic Coleslaw: The combination of hot, crispy fried chicken and cold, creamy coleslaw is one of the most fundamentally satisfying food pairings that exists. The cool, tangy coleslaw provides direct textural and temperature contrast to the hot, crunchy chicken and cuts through the richness of the fried coating with each alternating bite, preventing the meal from ever feeling too heavy or one-dimensional.
With Mashed Potatoes and Gravy: Serve alongside creamy mashed potatoes topped with a simple pan gravy made from the seasoned frying oil and chicken drippings for a deeply comforting, complete meal that honors the classic American Southern tradition this recipe draws from. The combination is filling, satisfying, and deeply nostalgic in the best possible way.
With Buttermilk Biscuits: Warm, flaky buttermilk biscuits alongside crispy fried chicken is another iconic pairing that needs no justification beyond how extraordinarily well the two things taste together. Use the leftover buttermilk from the marinade as the base for the biscuit dough to avoid waste and add a subtle continuity of flavor between the two components of the meal.
As Fried Chicken Sandwiches: Place a piece of fried chicken — preferably a breast piece — between two toasted brioche buns with pickles, shredded lettuce, and a generous spread of spicy mayo for a fried chicken sandwich that rivals anything available at any fast food establishment. This presentation works particularly well for feeding a crowd casually and informally.
Creative Variations
Spicy Fire Version: Double the cayenne pepper in the coating, add one teaspoon of chili powder and one teaspoon of hot smoked paprika, and brush the finished fried chicken immediately after draining with a sauce made from melted butter, hot sauce, and honey. This produces a fiery, glossy, deeply addictive version that satisfies spice lovers without sacrificing any of the crunch from the original coating.
Buttermilk Oven-Baked Version: For a significantly lighter alternative, preheat the oven to 220°C (425°F). After double dredging, spray the coated chicken pieces generously with cooking spray and arrange on a wire rack set over a baking sheet. Bake for thirty-five to forty minutes, turning once halfway through, until golden, crispy, and cooked through. The result is not identical to the fried version but is considerably crispier and more flavorful than most baked chicken recipes achieve.
Honey Glazed Variation: After frying and while the chicken is still hot, brush each piece lightly with a mixture of warm honey and a small amount of Dijon mustard. The honey caramelizes against the hot crust and creates a sweet, sticky, golden glaze that adds an entirely new flavor dimension without altering the fundamental character of the dish in any way that feels jarring or out of place.
Air Fryer Version: After double dredging, spray the coated chicken liberally with cooking spray and arrange in a single layer in the air fryer basket without overlapping. Cook at 200°C (390°F) for eighteen to twenty-two minutes, flipping once halfway through, until deeply golden and the internal temperature reads 74°C (165°F). The air fryer produces a remarkably crispy result with a fraction of the oil required for deep frying.
Storage Instructions
Allow the fried chicken to cool completely to room temperature before storing. Place the cooled pieces in an airtight container lined with paper towels to absorb any residual moisture and refrigerate for up to four days. To reheat and restore the crust to something approaching its original crispness, arrange the cold chicken pieces on a wire rack set over a baking sheet and reheat in an oven preheated to 190°C (375°F) for twelve to fifteen minutes. Never reheat fried chicken in a microwave — the microwave generates steam that destroys the crust completely and turns it soft and unpleasantly chewy within seconds. For freezing, place fully cooled fried chicken pieces in a single layer on a baking sheet, freeze until solid, then transfer to airtight freezer bags for up to three months. Reheat directly from frozen in a 190°C oven for twenty to twenty-five minutes.
Notes
- Never skip the overnight marinade: The buttermilk marinade is not a suggestion or a shortcut — it is the most important step in this entire recipe for achieving the juicy, tender interior that makes the contrast with the crispy crust so deeply satisfying. The lactic acid in buttermilk tenderizes the chicken slowly and gently over several hours in a way that no quick brine or dry rub can replicate. Four hours is the absolute minimum and overnight is strongly preferred for the best possible result every time.
- Maintain oil temperature throughout frying: The single most common mistake in home fried chicken is allowing the oil temperature to drop too far when the cold chicken pieces are added to the pot. Adding chicken to the oil lowers the temperature immediately — the more pieces added at once, the greater the temperature drop. Fry in small batches, monitor the thermometer constantly, and adjust the heat under the pot as needed to keep the oil as close to 175°C as possible throughout the entire frying process.
- Rest on a wire rack, never on paper towels: This distinction matters significantly more than most home cooks realize. Paper towels trap the steam escaping from the hot chicken underneath the crust, where it condenses and softens the coating from below within minutes of the chicken leaving the oil. A wire rack allows that steam to escape freely in all directions, preserving the integrity and crunch of the crust from every surface simultaneously.
Frequently Asked Questions (FAQs)
Q1. What is the actual secret to KFC’s famous flavor?
The foundation of KFC’s flavor is a proprietary blend of eleven herbs and spices that Colonel Sanders confirmed existed throughout his lifetime without ever publicly disclosing the exact formulation. Food scientists and culinary researchers have spent decades reverse-engineering the blend, and the consensus points consistently to a combination of celery salt, white pepper, black pepper, garlic powder, onion powder, dried thyme, dried basil, dried oregano, smoked paprika, ground mustard, and cayenne — which is precisely the spice blend this recipe uses. The other critical factors are the buttermilk marinade, the double-dredging technique, and frying at the correct temperature.
Q2. Can I use boneless chicken instead of bone-in pieces?
Yes, and boneless chicken — particularly boneless thighs or breast cutlets — actually fries faster and more evenly than bone-in pieces, making it a convenient option for weeknight cooking. Adjust the frying time downward to eight to ten minutes for boneless thighs and six to eight minutes for thinner breast cutlets, and monitor the internal temperature carefully to avoid overcooking. The flavor and texture of the crust will be identical to the bone-in version — only the cooking time changes significantly.
Q3. Why does my coating fall off during frying?
Coating separation during frying is almost always caused by one of three things: excess moisture on the chicken surface before dredging, insufficient resting time after dredging before frying, or oil that is not hot enough when the chicken enters the pot. Ensure the chicken is well dried before dredging, allow the coated pieces to rest on a wire rack for at least fifteen minutes after dredging, and verify that the oil has reached 175°C before adding any chicken to the pot. Addressing all three of these factors eliminates coating separation in the vast majority of cases.
Q4. Can I reuse the frying oil after cooking?
Yes, frying oil can be reused multiple times when handled correctly. Allow the used oil to cool completely, then strain it through a fine mesh strainer or cheesecloth to remove all the coating particles and food debris that would burn and turn bitter during subsequent frying sessions. Store the strained, cooled oil in a sealed container at room temperature or in the refrigerator for up to one month. Discard the oil when it develops a dark color, an unpleasant odor, or begins to smoke at lower temperatures than it previously did — all of which indicate that the oil has degraded beyond the point of safe and pleasant reuse.
Conclusion
This KFC-style fried chicken recipe proves convincingly that the most iconic fried chicken in the world is not beyond the reach of any home cook willing to respect the marinade, master the oil temperature, and trust the double-dredging technique — delivering a crust that shatters, a seasoning that lingers, and a juicy interior that rivals the original in every meaningful way, all from the comfort of your own kitchen without a drive-through in sight.


