
Chicken Breast Wraps: The Versatile, Satisfying Meal That Works Every Single Time
Chicken breast wraps sit at that perfect intersection of quick, healthy, and genuinely delicious that makes them a staple in households, meal prep routines, and lunch menus around the world. There is a reason they appear on virtually every café menu, every meal prep guide, and every list of easy weeknight dinners — they work. A warm, lightly toasted tortilla wrapped around tender, well-seasoned chicken breast with crisp vegetables, a bold sauce, and melted cheese produces a meal that is satisfying, portable, nutritionally complete, and adaptable to virtually any flavor preference.
What makes chicken breast wraps particularly valuable is their flexibility. The chicken breast itself is a neutral, lean canvas that accepts any seasoning profile — Italian herbs, Mexican spices, Mediterranean flavors, Asian-inspired glazes, or classic garlic and lemon. This means a single technique produces infinite variations without requiring new skills or different equipment each time. Learn to cook a great chicken breast and dress a great wrap, and you have a reliable, exciting meal for every day of the week.
This article covers everything — selecting and cooking the chicken, building the best wrap, a detailed recipe, expert tips, serving ideas, flavor variations, nutritional information, and a thorough FAQ section.
Why Chicken Breast Works Best in Wraps
Chicken breast is the ideal wrap protein for several reasons. It is lean, which keeps the wrap from feeling heavy. It slices cleanly into even strips that distribute evenly through the filling. Its mild flavor absorbs marinades and seasoning blends completely, allowing the cook to define the character of the wrap entirely through seasoning choices. And it cooks quickly — a properly pounded chicken breast is ready in under fifteen minutes from pan to plate.
The key to a great chicken breast wrap is not the tortilla or the toppings — it is the chicken itself. Dry, overcooked chicken breast ruined by insufficient seasoning or too much heat makes every wrap forgettable. Juicy, well-seasoned, properly rested chicken breast makes every wrap outstanding. The technique matters and is worth understanding properly before the first slice goes into a tortilla.
Key Ingredients
The Chicken Breast
Boneless, skinless chicken breasts are the starting point. For even cooking, pound each breast to a uniform thickness of approximately half an inch using a meat mallet or the bottom of a heavy pan. Uneven thickness is the most common cause of dry chicken breast — the thin edges overcook while the thick center finishes. Pounding takes sixty seconds and solves the problem entirely.
The Universal Seasoning Blend:
- 1 teaspoon garlic powder
- 1 teaspoon onion powder
- 1 teaspoon smoked paprika
- ½ teaspoon dried oregano or Italian seasoning
- ½ teaspoon cumin (optional for a warmer flavor)
- Salt and freshly cracked black pepper to taste
- 2 tablespoons olive oil
- 1 tablespoon fresh lemon juice
This blend works with virtually any wrap flavor direction and produces chicken that is well-seasoned, slightly smoky, and deeply flavorful without being divisively specific. Marinate for at least 20 minutes — or overnight refrigerated — for maximum flavor penetration.
Cooking the Chicken
Pan-searing in a hot cast iron skillet or heavy stainless steel pan over medium-high heat produces the best results for wraps — a golden, caramelized exterior that carries the seasoning beautifully and a juicy interior. Cook for 5 to 6 minutes per side, adjusting for thickness. The internal temperature must reach 165°F (74°C). Rest for 5 minutes before slicing.
Grilling adds a smoky char that suits Tex-Mex and Mediterranean flavor profiles particularly well. Same timing as pan-searing over medium-high direct heat.
Baking at 400°F (200°C) for 20 to 22 minutes is the most hands-off method and works well when cooking multiple breasts simultaneously. Less caramelization than pan-searing but reliable and easy.
Slicing should always be against the grain — perpendicular to the visible muscle fibers — and into strips approximately half an inch wide. This shortens the muscle fibers and produces noticeably more tender, easier-to-eat strips.
The Sauce or Dressing
The sauce is what defines the flavor character of the wrap more than any other component. It must be bold enough to season the chicken, the vegetables, and the tortilla simultaneously.
Garlic Herb Sauce:
- 3 tablespoons mayonnaise
- 1 tablespoon Greek yogurt
- 1 garlic clove, minced
- 1 teaspoon fresh lemon juice
- 1 tablespoon fresh parsley or chives, chopped
- Salt and pepper to taste
Honey Mustard:
- 2 tablespoons mayonnaise
- 1 tablespoon Dijon mustard
- 1 tablespoon honey
- 1 teaspoon apple cider vinegar
Chipotle Lime:
- 3 tablespoons mayonnaise or sour cream
- 1 chipotle pepper in adobo, minced
- 1 tablespoon fresh lime juice
- ½ teaspoon cumin
Caesar Dressing:
- Store-bought or homemade Caesar with fresh lemon juice and extra Parmesan stirred in
Each of these sauces suits a different flavor direction and can be made in under five minutes.
The Vegetables
Vegetables provide crunch, freshness, color, and nutritional balance. For chicken breast wraps, choose vegetables that are crisp enough to provide textural contrast without dominating the flavor.
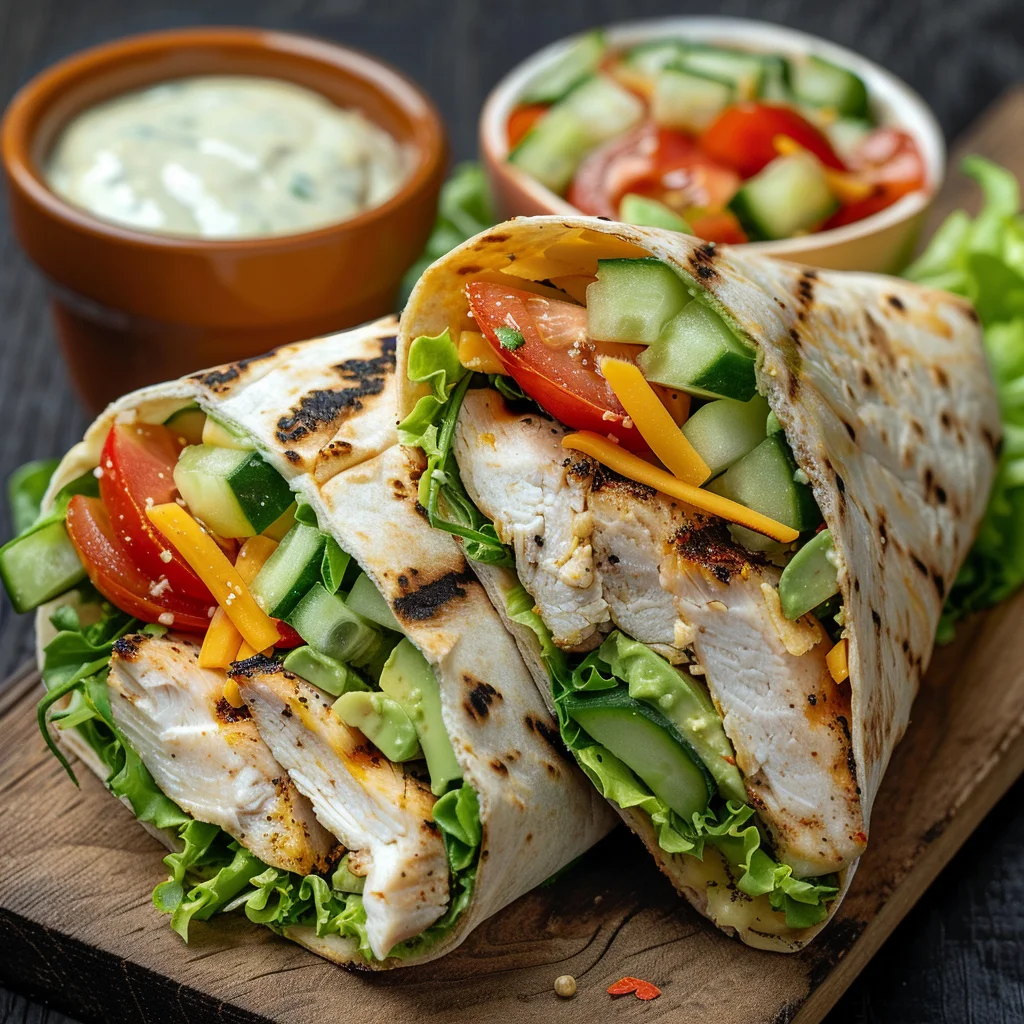
Romaine or iceberg lettuce — shredded or in whole leaves — provides the essential crunch baseline. Shredded red cabbage adds color and a more robust crunch that holds up longer without wilting. Cherry tomatoes, halved, add juicy sweetness and acidity. Cucumber, thinly sliced or diced, adds cool refreshing crunch. Avocado or guacamole contributes creamy richness and healthy fats. Red onion, very thinly sliced, adds a sharp bite that cuts through the richness of the sauce. Roasted red peppers add sweet, slightly smoky softness.
The Cheese
Cheese is optional but makes a significant difference. Shredded cheddar is the most widely used — its sharp, bold flavor works with most sauce and seasoning combinations. Monterey Jack melts more smoothly for a milder, creamier result. Feta suits Mediterranean-flavored wraps with its tangy, salty crumble. Pepper Jack adds heat alongside creaminess for spicier variations.
The Tortilla
Large flour tortillas — 10 to 12 inches — are the standard choice. Warm each one in a dry skillet for 20 to 30 seconds per side or directly over a gas flame for 10 to 15 seconds per side until pliable, fragrant, and lightly charred in spots. This single step is one of the most impactful in the entire recipe — a warm, pliable tortilla rolls without cracking and tastes significantly better than a cold one.
Whole wheat tortillas are a nutritional upgrade. Spinach or sun-dried tomato tortillas add color and mild flavor. Low-carb tortillas suit those monitoring carbohydrate intake.
Step-by-Step Recipe
Prep Time: 15 minutes Cook Time: 15 minutes Total Time: 30 minutes Servings: 4
Ingredients
For the chicken:
- 1.5 lbs boneless, skinless chicken breasts
- 2 tablespoons olive oil
- 1 tablespoon fresh lemon juice
- 1 teaspoon garlic powder
- 1 teaspoon smoked paprika
- 1 teaspoon onion powder
- ½ teaspoon dried oregano
- Salt and black pepper to taste
For the wraps:
- 4 large flour tortillas (10 to 12 inches)
- 2 cups romaine lettuce, shredded
- 1 cup cherry tomatoes, halved
- 1 cucumber, thinly sliced
- 1 ripe avocado, sliced
- ½ red onion, thinly sliced
- ½ cup shredded cheddar cheese
- Garlic herb sauce or your preferred sauce
Instructions
Step 1 — Prepare and marinate the chicken. Pound each chicken breast between plastic wrap or in a zip-lock bag to an even thickness of approximately half an inch. Combine olive oil, lemon juice, garlic powder, smoked paprika, onion powder, dried oregano, salt, and black pepper in a bowl. Add the chicken, turn to coat completely, and marinate for at least 20 minutes at room temperature or up to 8 hours refrigerated.
Step 2 — Cook the chicken. Heat a cast iron skillet or heavy pan over medium-high heat until very hot. Remove the chicken from the marinade and pat lightly dry with paper towels to prevent excess marinade from burning rather than browning. Add the chicken and cook for 5 to 6 minutes per side without moving until deeply golden on the exterior. The internal temperature should reach 165°F (74°C). Transfer to a cutting board.
Step 3 — Rest and slice. Allow the chicken to rest for 5 minutes — this step is essential for juicy chicken. Identify the direction of the muscle fibers on the surface and slice across them at a slight diagonal into strips approximately half an inch wide. Taste a piece — if it needs more salt or a squeeze of lemon, add it now before it goes into the wrap.
Step 4 — Make the sauce. Whisk together your chosen sauce ingredients in a small bowl until smooth. Taste and adjust — the sauce should be noticeably bold since it will need to season the entire filling.
Step 5 — Warm the tortillas. Heat each tortilla in a dry skillet over medium heat for 20 to 30 seconds per side until warm, pliable, and developing light golden spots. Stack inside a clean kitchen towel to keep warm during assembly.
Step 6 — Assemble the wraps. Lay a warm tortilla flat on a clean surface. Spread two tablespoons of sauce in the center of the tortilla. Layer the shredded romaine, sliced chicken strips, cherry tomatoes, cucumber, avocado, and red onion. Scatter the shredded cheddar over the top. Add a small extra drizzle of sauce directly over the filling.
Step 7 — Roll and serve. Fold the left and right sides of the tortilla inward by one inch. Starting from the bottom edge, roll firmly upward, maintaining steady tension throughout to create a tight, compact wrap. Place seam-side down and allow to rest for one minute. Slice diagonally through the center with a sharp knife. Serve immediately with extra sauce alongside.
Expert Tips
Pound the chicken to even thickness. This is the most impactful sixty-second task in the recipe. Uneven chicken produces overcooked thin sections and undercooked thick ones. A uniformly half-inch thick breast cooks perfectly evenly in the same time across its entire surface.
Rest the chicken before slicing. Five minutes of resting after cooking allows the juices to redistribute throughout the meat. Cut immediately and those juices run onto the cutting board. Rest first and the chicken stays moist and juicy all the way through every strip.
Slice against the grain. Look at the cooked chicken surface and identify the direction of the muscle fibers. Cut perpendicular to them — not parallel. This produces tender, easy-to-chew strips rather than long, stringy ones.
Warm the tortilla without exception. Cold tortillas crack when rolled and taste noticeably less pleasant than warm ones. The thirty seconds this takes is the single highest-return-on-investment step in wrap making.
Do not overdress. Apply sauce in two stages — one layer spread directly on the tortilla before adding the filling, and a small drizzle over the assembled filling before rolling. This distributes the sauce throughout without concentrating it in a wet pocket that makes the wrap soggy.
Roll with tension. A loosely rolled wrap falls apart when cut and during eating. Roll with firm, consistent tension from bottom to top, tucking the sides in as you go. The result is a compact, structurally sound wrap that holds together from first bite to last.
Serving Suggestions
Chicken breast wraps are a complete meal without anything additional, but thoughtful accompaniments make them better.
A simple green salad with a light lemon vinaigrette provides a fresh, acidic contrast that cuts through the richness of the sauce and cheese. Sweet potato fries or oven-baked regular fries are the most popular accompaniment — their starchy, slightly sweet character balances the bold seasoning of the chicken. A bowl of tomato soup alongside makes the meal heartier and more comforting for colder days.
For packed lunches and meal prep, assemble the wraps without the sauce and avocado — both stored separately — and add them fresh at eating time. The chicken, lettuce, tomatoes, and cucumber all hold well together for up to four hours in a sealed wrap. The sauce in a small container and the avocado in a separate sealed bag keeps everything fresh until needed.
For parties and casual gatherings, slice the assembled wraps into thirds and serve as finger food on a platter. Arrange small bowls of each sauce option alongside for dipping. They disappear quickly and require no cutlery, making them ideal stand-up party food.
Flavor Variations
Mediterranean Chicken Breast Wraps: Season the chicken with oregano, lemon, garlic, and olive oil. Fill with hummus, feta, cucumber, cherry tomatoes, Kalamata olives, and red onion. Dress with a lemon-herb tahini sauce. Serve in a warm pita or flour tortilla.
Tex-Mex Chicken Breast Wraps: Season the chicken with cumin, chili powder, smoked paprika, and lime. Fill with black beans, charred corn, shredded pepper Jack cheese, pico de gallo, and avocado. Dress with chipotle lime sauce. Warm the tortilla over an open flame.
Asian-Inspired Chicken Breast Wraps: Marinate the chicken in soy sauce, sesame oil, ginger, garlic, and a touch of honey. Slice and wrap with shredded cabbage, julienned carrots, sliced cucumber, edamame, and sesame seeds. Dress with a sesame-ginger sauce or peanut sauce.
BBQ Chicken Breast Wraps: Season simply with smoked paprika, garlic, and brown sugar. Brush with barbecue sauce during the final minute of cooking. Fill with shredded coleslaw, pickled jalapeños, cheddar, and extra barbecue sauce for a smoky, sweet wrap with a Southern-inspired character.
Greek Chicken Breast Wraps: Marinate in lemon, garlic, olive oil, and dried oregano. Fill with tzatziki, sliced cucumber, cherry tomatoes, red onion, and crumbled feta. Serve in a warm pita bread for the most authentic presentation.
Caprese Chicken Breast Wraps: Season the chicken simply with garlic, olive oil, and Italian herbs. Fill with fresh mozzarella, sliced tomatoes, fresh basil, and a drizzle of balsamic glaze. Simple, elegant, and genuinely Italian in character.
Nutritional Information
A standard chicken breast wrap made with pan-seared chicken, romaine, tomatoes, cucumber, avocado, cheddar, and garlic herb sauce in a flour tortilla provides approximately 480 to 560 calories per serving, 38 to 44 grams of protein, 38 to 46 grams of carbohydrates, and 16 to 24 grams of fat.
Chicken breast provides complete protein — all essential amino acids — alongside B vitamins, phosphorus, and selenium with very low saturated fat. The avocado contributes heart-healthy monounsaturated fats, potassium, and vitamin E. Romaine delivers vitamin K, folate, and vitamin A. Cherry tomatoes provide lycopene and vitamin C. The whole grain tortilla option adds fiber and B vitamins.
For a lighter wrap, use a whole wheat tortilla, replace mayonnaise-based sauce with Greek yogurt sauce, reduce cheese to two tablespoons, and skip the avocado or reduce to a few slices. These adjustments bring the calorie count to approximately 380 to 420 per serving while preserving full flavor.
Frequently Asked Questions
Q1. How do I keep chicken breast wraps from getting soggy?
Three practices prevent sogginess. Spread the sauce directly on the tortilla rather than only on the filling — this creates a moisture barrier between wet ingredients and the tortilla surface. Place the lettuce as the first filling layer directly over the sauce — it acts as a physical barrier. Store any sauce, avocado, or tomatoes separately if making the wrap more than thirty minutes before eating and add them fresh at serving time.
Q2. Can I make chicken breast wraps ahead of time for meal prep?
Yes. Cook the chicken, slice, and store in an airtight container for up to 4 days. Prepare the sauce and refrigerate separately for up to 5 days. Keep vegetables prepped in individual containers. Assemble wraps fresh each day using the pre-prepped components — total assembly time is under three minutes with everything ready. This approach keeps every component at its best throughout the week.
Q3. How do I prevent the chicken from drying out?
Four practices reliably produce juicy chicken breast: pound to even thickness, marinate for at least 20 minutes, cook over genuinely high heat for a short time rather than low heat for longer, and rest for 5 full minutes before slicing. An instant-read thermometer removes all guesswork — pull the chicken from the heat at exactly 165°F (74°C) and rest immediately.
Q4. Can I use leftover chicken for these wraps?
Yes — leftover roasted, grilled, or poached chicken works perfectly. Slice or shred and toss with a tablespoon of olive oil and a squeeze of lemon juice to refresh it. Warm briefly in a pan over medium heat before assembling if desired. Leftover rotisserie chicken is the best ready-to-use option and produces excellent wraps with minimal effort.
Q5. What is the best tortilla size for chicken wraps?
A 10 to 12-inch flour tortilla is the correct size for a generously filled wrap. Smaller tortillas — 8 inches — work for lighter, less-filled versions but cannot accommodate the full quantity of filling described in this recipe without overflowing. Tortillas larger than 12 inches are typically used for burritos and produce too much tortilla relative to filling in a wrap context.
Q6. How do I make the wrap stay closed when I cut it?
Three things keep a wrap intact when sliced: rolling tightly with consistent tension, resting seam-side down for one minute before cutting, and using a sharp serrated knife with a single clean cut rather than a sawing motion. A dull knife tears the tortilla and dislodges the filling. A sharp knife cuts cleanly through both the tortilla and the filling in one motion. Place one hand firmly on top of the wrap and cut with confidence directly through the center.
Q7. Can I grill the tortilla after assembling the wrap?
Yes — and it produces an outstanding result. Brush the exterior of the assembled wrap with a thin layer of olive oil or garlic butter. Place seam-side down in a hot grill pan or skillet over medium heat for 2 to 3 minutes until golden and lightly charred. Flip carefully and grill the other side for 1 to 2 minutes. The toasted exterior adds flavor and structural integrity that holds the wrap together particularly well.
Q8. Is chicken breast wrap suitable for a low-carb diet?
Yes, with modifications. Replace the flour tortilla with a large romaine lettuce leaf or a collard green leaf as the wrap vessel — both hold a substantial filling well and provide a genuinely satisfying handheld format. Use a Greek yogurt-based sauce in place of mayonnaise. Skip the cheese or use a small amount. These adjustments reduce carbohydrates to approximately 8 to 12 grams per serving while keeping the protein, freshness, and flavor intact.
Conclusion
Chicken breast wraps earn their place as one of the most reliable, versatile, and genuinely satisfying meals in everyday cooking because they deliver on every front simultaneously. They are fast enough for weeknights, impressive enough for guests, practical enough for meal prep, and flexible enough to accommodate any flavor preference, any dietary requirement, and any occasion.
The fundamentals are simple but non-negotiable — pound the chicken to even thickness, marinate it, cook it over high heat and rest it before slicing, warm the tortilla, bold the sauce, and roll with tension. Apply these five practices consistently and every chicken breast wrap you make will be genuinely excellent — juicy, well-seasoned, structurally sound, and deeply satisfying from the first bite to the last.


